Spent a few hours last night , playing around with Photoshop, which is very hypocritical as i am not digital designs biggest fan. But who am i to bitch about it all, i suppose the most crucial step towards solving a problem is to be able to recoginise yourself as part of the problem. One thing about my work that i try to always have at the back of my mind is that it is important to reject and not imploy my own "style", i want people to situate my ideas as a system of thought rather than something beautified tagged with my name. So heres my "system of thinking" about how to construct an eye on Photoshop. This post is dedicated to a friend whom i will name "Sleepy dust" who seems to question the things i do, you know who you are.
Step . 1 Step . 2 Step . 3
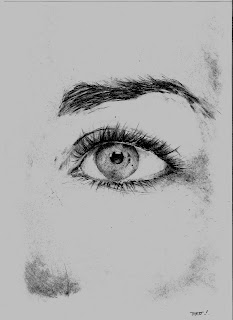
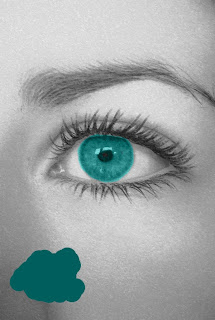
Step . 1 - Here is the picture of an eye i spent considerable amount of hours drawing. it is simply an h + 6h pencil on a piece of A3 white cartridge paper. This was originally a face but as my scanner is only A4 i have decided to just work magic on a part of it. You can alternativly use a photo i suppose, if so just make sure that you completely desaturate it first, it will matter later on.
Step . 2 - Create a new layer and set it to "colour", if you want to be adventerous use multiply. Colour the eye in with any colour of Aqua-ish desired, i have splashed mine in the corner if you want to use it.( R=0 , G=94, B=93). It is also important to note that what brush you use does not matter at this time, i used the standard drop shadow brush, just make sure your opacity and flow are sitting on 100.
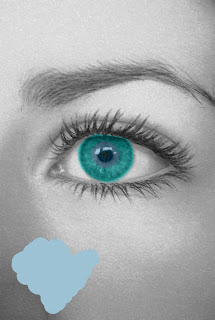
Step . 3 - Use the colour provided by the splash here and just fill in around the iris of the eye, it will make a difference later on. ( R = 157, G=194, B=212). It may pay off here to change your brush to 0% hardness, once again only a suggestion.
Step . 4 Step . 5
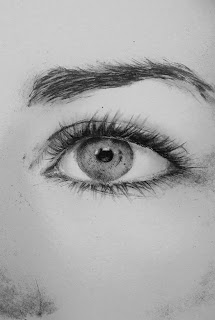
Step . 4 + 5 - These steps only apply if you have drawn in your eye. otherwise completely ignore and simply move on. This is easily the hardest step for me , because not only am i more pathetic than a 5 year old child at using photoshop but im not very patient. Here is alot of trial and error in using a mixture of bright/contrast , spongestick and blur filters to try and conceal that pencil, and grainy rough look into something alot more smooth and elegant. i have also abused the dodge tool.. yes i am a whore when it comes to that tool.


Step . 6


Step . 7 Step . 8 Step . 9

Step . 10


Original image, scanned onto the comp- just using brushes, crop tools and filters to try "normalize" the look, this can usually take a fair amount of hours, but just keep plowing away. If you are using an image that is no so sketchy, or a photo skip these inital introduction steps.


Step . 1 Step . 2 Step . 3
Step . 1 - Here is the picture of an eye i spent considerable amount of hours drawing. it is simply an h + 6h pencil on a piece of A3 white cartridge paper. This was originally a face but as my scanner is only A4 i have decided to just work magic on a part of it. You can alternativly use a photo i suppose, if so just make sure that you completely desaturate it first, it will matter later on.
Step . 2 - Create a new layer and set it to "colour", if you want to be adventerous use multiply. Colour the eye in with any colour of Aqua-ish desired, i have splashed mine in the corner if you want to use it.( R=0 , G=94, B=93). It is also important to note that what brush you use does not matter at this time, i used the standard drop shadow brush, just make sure your opacity and flow are sitting on 100.
Step . 3 - Use the colour provided by the splash here and just fill in around the iris of the eye, it will make a difference later on. ( R = 157, G=194, B=212). It may pay off here to change your brush to 0% hardness, once again only a suggestion.


Step . 4 Step . 5
Step . 4 + 5 - These steps only apply if you have drawn in your eye. otherwise completely ignore and simply move on. This is easily the hardest step for me , because not only am i more pathetic than a 5 year old child at using photoshop but im not very patient. Here is alot of trial and error in using a mixture of bright/contrast , spongestick and blur filters to try and conceal that pencil, and grainy rough look into something alot more smooth and elegant. i have also abused the dodge tool.. yes i am a whore when it comes to that tool.


Step . 6
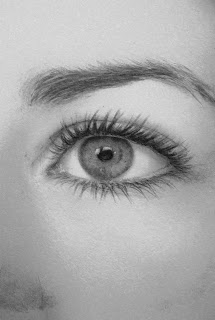
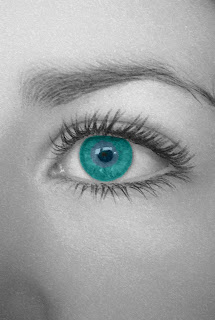
Step . 6 - Using the colour provided to the left of step . 6 ( R=255, G= 243, B=209) colour absolutely everything around the eye. Again the colour here is optional, but i wouldnt stray far away from that bone/cream colour. you really want something on the pallete that almost melts with the colours you are using in the iris. A light orange/peach would work well for Hazel coloured eyes.


Step . 7 Step . 8 Step . 9
Step . 7 - This step can be missed but i mean if im using photoshop, i have obviously thrown in the town and might as will digitize ( if this is a word) the image as much as humanly possible. Image adjust with "brightness and contrast" - play around as much as you would like. Here i used B=6 , C=17
Step . 8 - Here enters the famed "burn" tool, so chuck that on and set the exposure to about 25%. I have almost forgotten, a vital point. "AT THE START OF THIS STEP MERGE YOUR VISIABLE LAYERS TOGETHOR" Cant stress how important this is, otherwise your burn will just start to make your image murky green. (which in my opinion is the worst colour.. unless your talking about candy colours in which case it is black, noone likes the black jellybean). Run the tool along the creases of the lid, both top + bottom and then also pay special attention to the lashes. i spent a good 3 or 4 strokes per lash. i would recommend zooming in and taking your time with a very thin brush here, it will also pay to use something more sketchy, such as a calligraphy brush.
Step . 9 - Once again still using the burn tool, change your bursh to something very small, micro in and run it along the edges of the eye. becareful to make it the same magnitude as the lashes. If either the lashes or the Iris outline is more powerful , the whole illusion can become ruined.

Step . 10
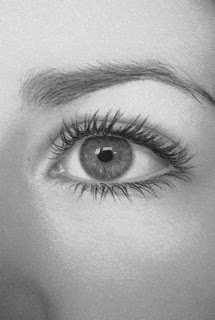
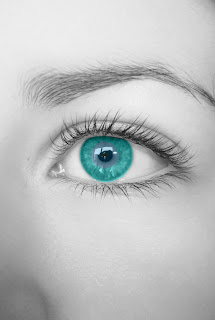
Step . 10 - Now switch back to my love child, the "dodge" tool. Start your exposure around 20% (unless your fairly confident or want something cartoony, then go for the 50% off the bat) and begin to use it ever so carefully around the inside of the pupil. Try not to venture past the 70% mark on the eye as that just tends to make the whole eye shine, and looks rather poor. Once your happy playing around with that, change exposure to 100% and then put either one or two small spots on , that are brighter than the rest.
Enjoy your Photoshoped image

Wow, very wow.
ReplyDelete